Monday, February 28, 2011

The Die is Cast

Well, a die is cast anyway. Two of them to be more precise.

The experimentation has been progressing well. I think I have plaster mixing and pouring down to a near science at the very least. Here is a picture of the die that I have made for the Portland Head Light tile:
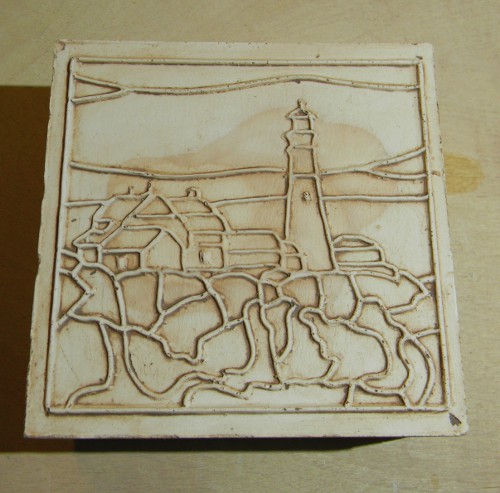
It still needs to be cleaned up and sanded around the edges to finish it off, but I seem to have the technique (or at least my technique) down. I made two of these dies and hope to have this tile design in production before another month is out. I am also working on a die to stamp my maker's mark into the back.

Portland Head and Whaleback lights are the first two lighthouses to get this treatment,but I am planning on a road trip this summer to take pictures a several more. Fort Point Light will get attention next. It has a wonderful keeper's house and is unusual for its square light tower.

I am casting these dies using leather hard clay instead of bisque. Wile bisque would last longer (I can get two casts easily with leather hard - probably more if I make the slab thicker), I can turn on a dime with unfired clay. I roll the slab and incise it the first day, leave it between two sheets of drywall overnight, and then clean up the image the second day and do the casting. The raw clay peels away from the plaster easily after about an hour and is generally ready for another impression as soon as I clean it off.

I will be working on a mold to make larger trivet sized versions of the Portland Head and Whaleback lights. These will be int he neighborhood of 6.5 to 7 inches square and will sit on cork feet.

I'm doing all I can to stay active these days. This has been the most relentless winter I can remember. I have to go back to 1968 to find one in memory that came close. I recall the snowbanks so high that we would walk on top of them because you could not see the street from the sidewalk. It was the first year that I had to attend school on a Saturday because so many days had been called off.

You can't help but be affected by this. My back is still screeching at me because of the shoveling I did this weekend. I'm 52 now, so I know I have to be careful, but I'm a one-man show here on top of Lowell Hill, so there you are.

Keeping busy at some pursuit other than the mundane is essential. Small breakthroughs like successful die casting can do a lot to raise the spirits.

More soon!

Friday, February 11, 2011

Another Art Update

The more you work at something, the more you learn. I have been working with the tile art for both the Whaleback and Portland Head tiles. One thing became glaringly clear. Tiles of any size with a mosaic pattern on them need to be impressionistic. Realism just won't fit, and even if it does, it will be impossible to paint because the detail will be too small.

Needless to say, some reworking has taken place. Here is what the tiles look like now:

Mind you, the line below the rocks on the Whaleback tile will be restored. I'm still playing around with placement on that one.

Note too that the names have been removed. They just took up too much space and interrupted the - what's a good word - flow of the art. I may put the names on the back, or assuming someone may actually want to mount one of these in a splash back someday, I may create a small card for each with a little history on each lighthouse. In any case, I wanted the tiles cleaner than text would allow.

Did you ever read "The Little Red Lighthouse and the Great Gray Bridge" by Hildegarde Swift and Lynd Ward when you were young? It's a story of (you guessed it) a little red lighthouse that guarded the shores of the Hudson River and kept ships safe from the rocks. It was very proud of the job it did. When a giant gray bridge is built right over it, the lighthouse believes that it has become insignificant. When a beacon shines from the bridge to light the river, the lighthouse is convinced that it is no longer useful. Then one night, a storm endangers ships by gripping them in fog. A tug crashes on the rocks because it can not see the beacon shining from atop the bridge. The bridge calls out to the lighthouse to shine its light and sound its fog bell. When the keeper arrives, the lighthouse is lit and the bell sounds out. Then the little red lighthouse discovers that small does not mean insignificant. It regains its pride in its function.

I must have missed the part of the book that told the reader to travel up Riverside Drive in New York City to visit the little red lighthouse. It is, in fact, properly known as the Jeffrey's Hook Light. It sits beneath the George Washington Bridge and is a New York City landmark.

I know my tile project focuses on Maine lighthouses, but this one seems a good exception. The artwork is currently in process after having received several pictures of the lighthouse from a friend with permission to use them as I see fit.

It's a great story and was one of my favorites when growing up.

Monday, January 31, 2011

Tile Update

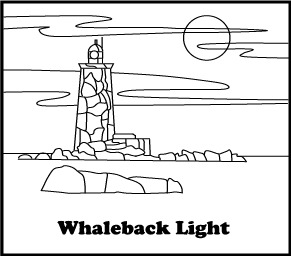
I have done more work on the tile design for Whaleback Light and added new artwork for Portland Head Light. Here are the line drawings.


The ocean in each of these tiles will be roughed out when the original is cut. I like an active, choppy sea that provides some motion. I'm hoping to get the appearance of sea spray by stippling as well. But it has to be doable in a short period of time.

Making these in four-inch sizes will probably necessitate some simplification of the mosaic design so that the hand decoration doesn't take too long. I am also thinking of making a larger trivet size, which would allow for more detail. Time and experimentation will tell, but just looking at the close tolerances of the light keeper's house on Portland Head give me the shivers. It's instantly recognized - the light being as iconic as it is - so getting it right is important.

But it's nice to have artwork to look at and work from.

Sunday, January 30, 2011

Pressing Matters

The tile making process took another big step ahead this weekend with the building of my tile press. I'm no engineer, but I have to say I'm rather pleased with this effort. As with any other project like this, I sort of designed it as I bought the parts. It's not the most efficient way of doing things, but when it comes to any sort of machine work, I tend to do better learning the ropes while I do things.

I knew I needed an arm with a spring for return. I also knew I needed an upright for the arm to pivot in. Then there is the press foot. Those were the essential three pieces for the press. Once I had them in place, I discovered that a guide arm would be necessary to keep the press foot from swinging as it raised and lowered. I would also need to figure out where I wanted the action to start and finish.

It was actually a lot of fun to observe this simple machine in action and determine what enhancements would be needed. It was worth the four trips to the hardware store it necessitated.
Potters may notice that the arm and press foot are made of parts from an old Bailey hand extruder. I modified them by drilling a few holes and moving parts around a bit.

Drilling through tool steel with a hand drill is such fun. But if you're looking for a handy shop tip, here is a great discovery I made: olive oil makes a great cutting oil.

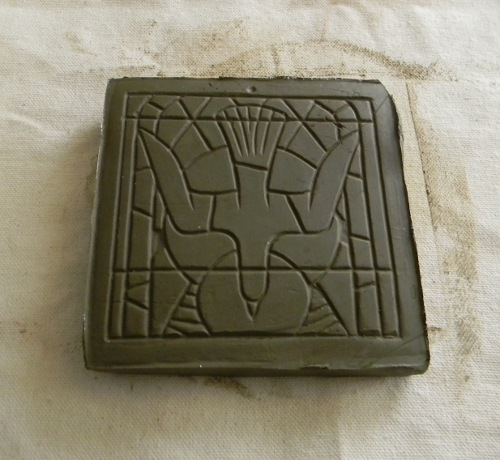
This press will work best for smaller tiles. There are better methods for making larger ones and I will be making molds for those in the near future. What I have to set about doing now is making originals to cast molds from. In my last post, I included a picture of the first die I made. It's rather big for a press like this unless working with pretty soft clay. Still, I gave it a try to see how the process works. Here is the result (before edge cleaning).
Not at all bad for a very first attempt.

Regarding originals from which to cast dies, I have started artwork on a series of tiles featuring lighthouses in Maine. They will be mosaic in design like the dove tile above. While there is still quite a bit to do on it, here is a preliminary layout for a tile featuring Whaleback Light. I sill want to add rocks to the foreground and clouds to the sky. The clouds will obscure the moon a bit for effect.
Mind you, the typeface will change. It's just there as a place holder, but I do plan on putting the name of each light on the tile.

But things are once again off and running!

Monday, January 24, 2011

To Die For...

I knew that making tiles would require a fair amount of study on my part. I wasn't wrong.

It wasn't the clay work that proved tricky. I have plenty of experience with clay and know how it behaves. Mind you, that doesn't stop a person having to learn the best way to keep a small slab from warping. That's something that clay likes to do under most conditions and figuring out how to keep it from happening has been the work and source of frustration of potters since someone said, "Hey look! If you line a basket with this sticky mud it will hold water!" There are techniques to stop warping and I know a few of them.

But where I had a lot to learn (and still do) is in plaster work. Mixing and pouring a wedging table is not that difficult once you get the math out of the way. But working in smaller quantities is a little trickier. See, the problem is that all plasters come with what is called a "use consistency." It is expressed as a number, and the use consistency of the plaster I have been working with is 70. What that means is that for the strongest possible end product, I have to mix 70 parts water for every 100 parts plaster.

By weight. Go figure. And figure I did. Long and short, I came to the answer by two routes. The first was to take someone's word for it that I needed 2.85 pounds of plaster for each quart of water. The second was to weigh a quart of water and calculate it myself. A quart of water weighs 2 pounds. Dividing 2 by 0.7 gave me...2.85. I'm a believer now. My algebra teachers would be so proud.

All of this is because making tiles first requires me to make a mold. The mold - or in this case the die - is used to stamp a consistent pattern on each tile. if you want to make tiles in any sort of production model, you need to do it this way. Hand carving each tile would take far too long to be practical.

The mold I wanted to make was a die mold. This type of mold is pressed into the clay to create a shape or, in this case, an impression. That meant hand making an original to make the mold from. Remember that tile I thought I'd make for the holiday season? It's a few entries down. I did make the original but ran out of time before I could put tiles into production. So I decided to put that project to next year.

Just as well. The process of learning to make the mold, while moving along nicely, is still a work in progress. But there has been progress! Here is a picture of the original and the die mold that I made from it just this evening:


The original was warped, so this die can't be used for production, but the mold form I made is ready as soon as I have a good, flat original. At least I have the process under control now. It will be full steam ahead very soon.

I have a number of ideas for tile series and will be working on the artwork for them starting next week. For now, I have other issues to concentrate on and concentration is proving difficult as I try to stay warm in the icebox that Maine has become. It happens almost every year at this time, but still it always seems to catch me up a little short.

More soon!

Sunday, December 26, 2010

Pouring Complete!

The biggest step in building a wedging table happened this afternoon. I poured the plaster.

Actually, the wedging table has taken somewhat longer to build than I thought it would. I'd like to blame that on the holidays and winter in general, but in truth, it's just been a slow process. I underestimated the amount of plaster I would need for one thing. That and the fact that I'm no carpenter. But somehow it came together.

Here are a couple of pictures taken this afternoon as I did the pour. Plaster has to be mixed very carefully and in the correct proportions in order to get the best strength and absorbent properties out of it. And each kind of plaster (there are many different kinds) has its own mixing ratio. Thankfully, potters are a verbose lot and willingly share their knowledge on things like this so the information was not hard to find. This particular table required 9 gallons of water and about 95.5 pounds of plaster. But it's what I wanted and will be in use as soon as the plaster has cured and I have covered it with heavy canvas.

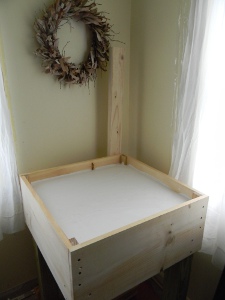
This shows the table with half the plaster poured:


And here is the table later in the day with the pouring completed. I doubt I will be moving the table again. At least not without help.


Once this is finished, the work can begin!

Saturday, December 18, 2010

New Link

I have put something new up on the web site. A number of people have contacted me looking for information on available products. Since my phone number is a cell phone and I'm not always (read not usually) at the workshop, it's not always easy to get that information to people when they want it.

So, by way of a workable solution, I decided to put up an inventory page so that people can see what is available right away.

Right now I am hard at work on a replacement for the rather basic HTML web site that I currently have up. The new site, which will have the exact same web address as the current one, will also have a complete online shop with a shopping cart. Orders can be placed through the site if customers wish to do that.

I like talking to my customers, and with so many products and options I can't see that relationship changing. Pottery is a very personal thing and getting it just right is always the goal.

Please do check out the Lowell Hill Pottery Inventory Page.