This has been a busy winter! In my last post on the petal cups, I said that I would spend the winter producing them. At some point, I set a goal of 1000, and while I had no illusions of achieving that goal in a single season, I have made an impressive start! I have also made a great deal of progress on the technique of forming them. Compare this picture to the one in the last post on the subject and you will see a big difference! I threw most of those early efforts out.
I estimate that I am almost halfway to the 1,000 goal. In fact, the kiln is almost full and ready for the first bisque firing. The cups in this picture will be the last to get stacked before I close the lid.
As I mentioned before, the method for making the petal cups was not passed along, and those who were around at the time are either gone now or do not remember clearly how they were made. Petal cups have not been made in almost 40 years as far as I can tell, so I had to figure some things out. Here is what I came up with.
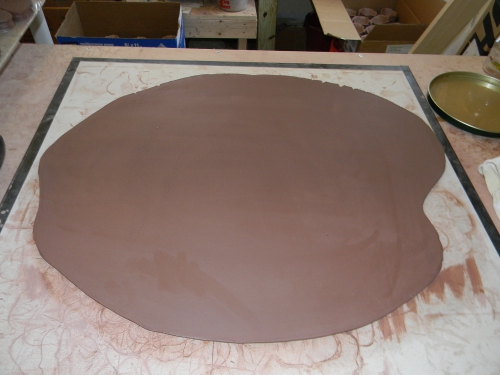
It all starts with a slab of clay. I am a wheel potter for the most part, and I don't have a slab roller, so I learned the art of wielding a rolling pin. Mind you, this particular rolling pin is 30 inches long and made for the purpose, so that helped.
But no matter how good the roller is, a nice, even slab is no small matter! I estimate that it takes me the better part of 15 minutes to get a slab rolled out to the correct thickness. There are all sorts of things you have to watch out for: Evenness of thickness, direction of the rolling action (it has to be changed several times), turning the slab over every few strokes (done by layering the slab between two sheets of canvas), and the dynamics of drying just to name a few. Fail in any of these, and the slab will yield unpredictable, often poor results.
Once the slab is made, it needs to rest and dry out for about a half hour before it can be worked. I stack the slabs between sheets of drywall for this purpose. The clay has to be stiff but plastic enough to bend and shape without cracking or breaking. The reason for stacking with drywall is to make sure that the top of the slab doesn't dry out any faster than the underside. If it does, the slab will warp - as will anything made from it.
I use a rose petal cutter for making what I call "blanks." Of course, nobody makes a rose petal cutter this big, so I had one made for me by the folks at Aunt Holly's right here in Maine (I love doing business locally). The cutter works beautifully with a little help from Murphy's Oil Soap, which I use as a releasing agent to keep the cutter from sticking.
I can usually get about 10 blanks from one slab, and with six slabs per run, well, you can do that math. Not all slabs fair as well. The slab in this picture only yielded eight.
Once the blanks are cut out, they are stacked and the stacks are wrapped in plastic to keep them from
drying out any further. Now the fun can begin!
I use a jig that I made for the purpose. It consists of a PVC floor drain turned upside down, a length of PVC pipe and a fitting into which I have glued an upside down wooden egg with the end cut off. Hard to picture?
The blanks are sponged to remove the pattern left on them by the canvas during the rolling out process. The edges are smoothed and rounded, and the maker's marks are put on the bottom. Then the blank is draped over the jig and the petals folded into place. The finished petal cup is allowed to dry at least one day and then is sponged again to smooth out any finger marks, rough edges and imperfections. Then they are allowed to dry for several days before stacking in the kiln. Because they are quite thin it doesn't take any longer than that.
In my first bisque firing of this year, I stacked only the petal cups. Not one was lost in the first firing, which is a great sign. In all, I ended up with 390 of them. Gad! Just short of an even 400. I need to get busy!
On Facebook recently, I stated that my production goal on petal cups is 1,000 this year. I just might reach it. But the tile project is calling my name once again, and I have already started on designs for holiday ornaments. You can't start too soon!
Friday, April 19, 2013
Monday, April 15, 2013
A New Home: Plans for the New Pottery Studio

I have finally staked out the position for my new pottery studio. At least, I have staked out its theoretical position. There are still so many hoops to jump through...finding a contractor, finalizing the design, getting permits and - oh yes - figuring out how to pay for the thing!
The field in this picture is right next to my house on Front Ridge Road in Penobscot, Maine. It's not as big as it may seem. In fact, those four stakes encompass pretty much the entire area available to me under zoning and setback rules for my town - at least for commercial buildings like this. The front stake is 55 feet from the edge of the road and the area measures 24 by 48 feet. Really, that's not a terribly large building - particularly for a pottery - but I've seen a lot of pots emerging from smaller spaces. And since I reconsidered and put the gambrel roof back in, I'll have more overflow storage.
Designing a pottery studio turned out to be something of a fraught process. Deciding where to locate equipment and supplies meant designing for an efficient work flow. It's interesting how ideas and resources will suddenly pop up when you need them. An article in Ceramics Monthly magazine had a lot of good advice.
Work Flow in a Pottery
This is the latest - and probably final - version of the pottery studio. If you have read previous posts on this, you will see that things have changed a great deal. There is more square footage and equipment has been shifted about.
The most important change is the attention to work flow. Ideally, pottery should go from wet clay to a finished pot in a single circular path around the studio. The more "back and forth" motion, the more expensive your production process. My earliest plans called for a full basement, the idea being that I would make pots in the cellar and sell them on the first floor.
Nice idea, but even at 54 years of age, I have determined that the less time I spend lugging clay around, the better. Somehow, carrying a ton of clay one 50-pound box at a time down the cellar stairs at least once each year didn't sit well. So, a concrete slab it is. With this design, clay is stored right by the door and only backs up once in the greenware area. From there, it makes a single clockwise circuit around the studio and comes to rest in the show area. The pattern looks something like this:
Note that the kilns are in the center of all this activity. I fire twice in my process, to that seemed to make sense. Besides, I have engineered this building for energy efficiency, and it seemed logical to put what may amount to a secondary heating system in the center of things. It also does away with the clumsy issue of having to install them at least 2 feet away from flammable surfaces.
Is this a good place to mention that the lumber company added in a second door on the back wall for safety purposes when they estimated the materials cost?
Ah, yes. Materials cost. Well, that was a bit of a surprise. It came in at just about $35,000, which was a good deal less than I thought it would be. Given that I want this place to be as energy efficient as possible, the insulation alone was a large chunk of that total, so there is a little wiggle room. But not a lot.
Of course, that price does not include the concrete pad, heating, plumbing or electricity. Nor does it include labor. So I expect that cost to do some multiplying, which brings me to the final issue:
When Worlds Collide: The Dream Meets Reality
I will be meeting with a prospective contractor in a few days to go over this. It doesn't take much to run up a big bill, and I expect all those items not included in the materials estimate will at least triple the cost - if not quadruple it. I won't know until I ask, though. I want in-floor radiant heat and I need three-phase power unless I want to replace most of my current equipment, which I suspect would cost even more.
Here's the plan: figure out how much this will actually cost, then mount a KickStarter campaign to raise as much of it as I have to. The rest will be a matter of personal finance. It's a big, ambitious idea and nothing is certain - except my determination to keep this wonderful heritage alive whatever it takes.
So please, do sign up for my newsletter if you haven't already. And check back frequently to see how things are progressing! And buying pottery is a good thing as well! And while you are doing all of this, have a great Spring!
Sunday, December 9, 2012
A New Home for Lowell Hill Pottery?
That is the question. This has certainly been an eventful year for Lowell Hill Pottery. It looks as though this year will end in the black - a first and not at all bad for the third year of a five year start-up. If that happens, it won't be due to a lack of challenges.
First there was the scrap metal fiasco that lost me the pug mill, then the fuel oil leak (resulting from said fiasco) that had us all in a panic (but amounted to naught). Then Sheila Varnum passed away - perhaps the most traumatic of all the events.
The legendary brick path was closed to pottery traffic for the first time in 80 years - not an unreasonable thing since the house would be inhabited by new tenants. Most of the summer was taken up with renovation to the house. And make no mistake about it, the house is absolutely beautiful as a result.
The new tenants weren't so sure about living in a space that was also occupied by a working business. A few panicked phone calls and about three days of very nervous waiting resulted in a compromise whereby Lowell Hill Pottery could remain in the building for one more season, but had to move after that.
So there it is. 2013 will be my final year at the old Rowantrees building.
It's not a bad thing, really. The building is well over 150 years old and showing every day of that age. There is so much rot in the walls that you can scoop it out with your bare hands. Window panes have started falling out of their frames. Of course, there is no heat. There hasn't been since 2008.
Add to that the lead contamination - some from the Rowantrees years but most from the fact that the buildings are old enough to have been painted with lead paint many times over.
Yeah, it's time to go. I would have preferred to wait at least one more year, but for one other small detail: I really need to be able to work year round on pottery. Having only five months out of each year to do the work is not compatible with increasing business volume or turning this pottery into the business I want it to be.
So the planning is now well under way. I have drawn up a plan for a modest studio space to go in the field by my house. I have spoken with a contractor and will soon start the agonizing process of figuring out how to pay for this. Here is a sketch of the floor plan and a picture of how it will look:
The dimensions are 24 by 36 feet and it will be on a simple concrete slab. I had hoped for a walk-in cellar space for the studio with one floor above for the stockroom and sales area, but I learned a hard lesson about what it costs to build from scratch.
At first, I thought about a 24 by 48 with a walk-in cellar and upstairs with a full bath, office and closet space. Thinking that was going to cost too much, I drafted a second plan that reduced the floor space to 24 by 32. Well, that smaller plan got estimated at $182,000. No way.
The illustrated plan above is not much larger than a generous two-car garage and is currently estimated at $67,000. That's still pretty steep, but I do want to do this right. That means energy efficiency and good choices in building materials. I have good people ready to help.
So now it's about the money. I am preparing to launch a project at Kickstarter.com. If you have never heard of it, Kickstarter is a web-based funding platform for creative projects. People like me who have a need for funding can put up a project and others willing to help can pledge support. There are premiums for those pledges as well. It's a lot like the pledge drives you see and hear on public broadcasting - but without the interruptions.
I will be posting updates on the studio project here, on my Facebook page, and on the Lowell Hill Pottery website. In the meantime, the most important thing I can do is build interest and community around this. Please help me spread the word about the Lowell Hill Pottery studio project so that when it is launched, there will be interested people ready to have a look.
The Rowantrees heritage and tradition deserves to survive.
First there was the scrap metal fiasco that lost me the pug mill, then the fuel oil leak (resulting from said fiasco) that had us all in a panic (but amounted to naught). Then Sheila Varnum passed away - perhaps the most traumatic of all the events.
The legendary brick path was closed to pottery traffic for the first time in 80 years - not an unreasonable thing since the house would be inhabited by new tenants. Most of the summer was taken up with renovation to the house. And make no mistake about it, the house is absolutely beautiful as a result.
The new tenants weren't so sure about living in a space that was also occupied by a working business. A few panicked phone calls and about three days of very nervous waiting resulted in a compromise whereby Lowell Hill Pottery could remain in the building for one more season, but had to move after that.
So there it is. 2013 will be my final year at the old Rowantrees building.
It's not a bad thing, really. The building is well over 150 years old and showing every day of that age. There is so much rot in the walls that you can scoop it out with your bare hands. Window panes have started falling out of their frames. Of course, there is no heat. There hasn't been since 2008.
Add to that the lead contamination - some from the Rowantrees years but most from the fact that the buildings are old enough to have been painted with lead paint many times over.
Yeah, it's time to go. I would have preferred to wait at least one more year, but for one other small detail: I really need to be able to work year round on pottery. Having only five months out of each year to do the work is not compatible with increasing business volume or turning this pottery into the business I want it to be.
So the planning is now well under way. I have drawn up a plan for a modest studio space to go in the field by my house. I have spoken with a contractor and will soon start the agonizing process of figuring out how to pay for this. Here is a sketch of the floor plan and a picture of how it will look:
The dimensions are 24 by 36 feet and it will be on a simple concrete slab. I had hoped for a walk-in cellar space for the studio with one floor above for the stockroom and sales area, but I learned a hard lesson about what it costs to build from scratch.
At first, I thought about a 24 by 48 with a walk-in cellar and upstairs with a full bath, office and closet space. Thinking that was going to cost too much, I drafted a second plan that reduced the floor space to 24 by 32. Well, that smaller plan got estimated at $182,000. No way.
The illustrated plan above is not much larger than a generous two-car garage and is currently estimated at $67,000. That's still pretty steep, but I do want to do this right. That means energy efficiency and good choices in building materials. I have good people ready to help.
So now it's about the money. I am preparing to launch a project at Kickstarter.com. If you have never heard of it, Kickstarter is a web-based funding platform for creative projects. People like me who have a need for funding can put up a project and others willing to help can pledge support. There are premiums for those pledges as well. It's a lot like the pledge drives you see and hear on public broadcasting - but without the interruptions.
I will be posting updates on the studio project here, on my Facebook page, and on the Lowell Hill Pottery website. In the meantime, the most important thing I can do is build interest and community around this. Please help me spread the word about the Lowell Hill Pottery studio project so that when it is launched, there will be interested people ready to have a look.
The Rowantrees heritage and tradition deserves to survive.
Thursday, August 30, 2012
New Arrival!
You may recall my sad tale of the loss of the pug mill. The glorious old mill that Rowantrees had used for so many decades was removed against our wishes by a scrap metal guy. The details don't really matter. It's gone and I have missed it sorely this season.
Now its replacement has arrived.
By far, this is a smaller machine, and it's nowhere near as fast. But mills like the old one just don't come along every day, and this one has a lot of advantages the old one did not. It's a trade off that I can live with.
I have already learned how to use this mill to wedge and mix clay - and it only arrived this morning! Clay recycling will start very soon.
For the potters among you, this is a Peter Pugger model VPM-9 deairing pug mill. It's kind of difficult finding a mill that doesn't use a vacuum pump though they really aren't needed to pug clay well. The vacuum takes the place of aging, not wedging.
For the non-potters, clay has to be as free of trapped air as possible to throw well. But the first step in clay preparation is to make sure that the water in the clay is as evenly distributed as possible so that every last particle of clay is wet. That is one factor in making clay as plastic and workable as it can be. Use of a vacuum pump in the pugging process pulls any air out of the clay, causing the water to move into the microscopic spaces that had previously trapped the air.
The pugging process is similar to a meat grinder. The clay is compacted by a screw auger and pushed through a small opening at the end of the barrel. This compacting process removes the air bubbles that can make throwing a real bear (not to mention the way pots can explode during firing).
I'm so thrilled to have this little shop assistant. I hope to be using it for many years to come. Profound thanks go to my dear friend Judy who made this possible.
The next large equipment upgrade will be a much larger kiln - but that's not this year's issue. Soon, plans will be underway for the new studio. There will be plenty to talk about then.
Now its replacement has arrived.
By far, this is a smaller machine, and it's nowhere near as fast. But mills like the old one just don't come along every day, and this one has a lot of advantages the old one did not. It's a trade off that I can live with.
I have already learned how to use this mill to wedge and mix clay - and it only arrived this morning! Clay recycling will start very soon.
For the potters among you, this is a Peter Pugger model VPM-9 deairing pug mill. It's kind of difficult finding a mill that doesn't use a vacuum pump though they really aren't needed to pug clay well. The vacuum takes the place of aging, not wedging.
For the non-potters, clay has to be as free of trapped air as possible to throw well. But the first step in clay preparation is to make sure that the water in the clay is as evenly distributed as possible so that every last particle of clay is wet. That is one factor in making clay as plastic and workable as it can be. Use of a vacuum pump in the pugging process pulls any air out of the clay, causing the water to move into the microscopic spaces that had previously trapped the air.
The pugging process is similar to a meat grinder. The clay is compacted by a screw auger and pushed through a small opening at the end of the barrel. This compacting process removes the air bubbles that can make throwing a real bear (not to mention the way pots can explode during firing).
I'm so thrilled to have this little shop assistant. I hope to be using it for many years to come. Profound thanks go to my dear friend Judy who made this possible.
The next large equipment upgrade will be a much larger kiln - but that's not this year's issue. Soon, plans will be underway for the new studio. There will be plenty to talk about then.
Sunday, August 12, 2012
Tea Pots!
I got an order for a large tea pot recently so i decided to tackle this Goliath head on. Tea pots are probably the greatest challenge any potter can face. Shape, proportion, fit, line, and all of the creative design issues all play a part. And having the design established for several decades does nothing to make the job easier. Last year, I made several of these pots and was satisfied with none of them. There were those that were passable, but nothing that really looked exactly the way it should.
So when I got the order, I was a little nervous. I wanted this to be right and look the best it could. There was nothing for it but to aim for a high goal, so I decided to make 20,
Now 20 tea pots is really 60 pots. You need 20 pots, 20 spouts and 20 lids. That doesn't even count the handle and the leaf on the lid. Those come later.
Once the pots, spouts and lids are thrown and trimmed, they need to be (gulp) assembled. That looks just a little like this:
Not the best photography in the world, I know, but you get the idea. It's a lot of eyeballing, eye crossing, cutting, shaving, whittling, cursing, fitting, sticking, and smoothing.
Did I say 'cursing'? Ok, I admit. It;s just as well that customers weren't flooding through the doors on the two days that I was engaged in this enterprise. I wasn't at my friendliest. But I got through it. And I have no doubt the next time will be just a bit easier. No less time and effort, but easier.
A bit.
So when I got the order, I was a little nervous. I wanted this to be right and look the best it could. There was nothing for it but to aim for a high goal, so I decided to make 20,
Now 20 tea pots is really 60 pots. You need 20 pots, 20 spouts and 20 lids. That doesn't even count the handle and the leaf on the lid. Those come later.
Once the pots, spouts and lids are thrown and trimmed, they need to be (gulp) assembled. That looks just a little like this:
Not the best photography in the world, I know, but you get the idea. It's a lot of eyeballing, eye crossing, cutting, shaving, whittling, cursing, fitting, sticking, and smoothing.
Did I say 'cursing'? Ok, I admit. It;s just as well that customers weren't flooding through the doors on the two days that I was engaged in this enterprise. I wasn't at my friendliest. But I got through it. And I have no doubt the next time will be just a bit easier. No less time and effort, but easier.
A bit.
Sunday, July 29, 2012
Mugs!
I love pictures like this. All those rims and handles lined up in rows. Every item like the others but not exactly because they were made by hand, not machine or mold. Mugs drying out on a warm summer day. Soon they will be ready for their first firing. They will be stocked with the bisque ware until needed.
I have a use planned for them. You will be able to read about this int he near future. History is in the making here!
And Here Comes Another Change
As any follower of this blog is aware, Lowell Hill Pottery has been operating in the former Rowantrees facility since inception. It was always clear that this arrangement would not be permanent, but with this season came word that I will need to relocate by the end of next season.
This is not a bad thing. Plans have been hanging about on the sidelines since the beginning, but now they need to shift into high gear. I will be measuring out the land next to my house on Lowell Hill (the namesake of my fledgling enterprise) to see how large a building it can accommodate. Then I'll talk to the folks at Efficiency Maine to see what sorts of idea they have regarding the most efficient designs. I want a building that is as inexpensive to operate as I can get it, and since I will be starting from scratch, this is the time to start making that happen. Once all that is done, it will be time to talk to contractors to see what they think the costs will be.
Then it's time to talk financing. Gulp...
This is going to happen. And you can follow the whole story right here. I'll be giving you blow by blow accounts of the building project and posting pictures as often as possible.
This is an exciting time for Lowell Hill Pottery. And I will do all I can to bring it to reality. I've come this far and hope you will join me on the ride ahead.
This is not a bad thing. Plans have been hanging about on the sidelines since the beginning, but now they need to shift into high gear. I will be measuring out the land next to my house on Lowell Hill (the namesake of my fledgling enterprise) to see how large a building it can accommodate. Then I'll talk to the folks at Efficiency Maine to see what sorts of idea they have regarding the most efficient designs. I want a building that is as inexpensive to operate as I can get it, and since I will be starting from scratch, this is the time to start making that happen. Once all that is done, it will be time to talk to contractors to see what they think the costs will be.
Then it's time to talk financing. Gulp...
This is going to happen. And you can follow the whole story right here. I'll be giving you blow by blow accounts of the building project and posting pictures as often as possible.
This is an exciting time for Lowell Hill Pottery. And I will do all I can to bring it to reality. I've come this far and hope you will join me on the ride ahead.
Subscribe to:
Posts (Atom)


