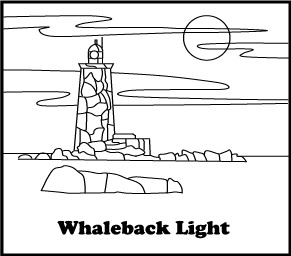
I have done more work on the tile design for Whaleback Light and added new artwork for Portland Head Light. Here are the line drawings.
The ocean in each of these tiles will be roughed out when the original is cut. I like an active, choppy sea that provides some motion. I'm hoping to get the appearance of sea spray by stippling as well. But it has to be doable in a short period of time.
Making these in four-inch sizes will probably necessitate some simplification of the mosaic design so that the hand decoration doesn't take too long. I am also thinking of making a larger trivet size, which would allow for more detail. Time and experimentation will tell, but just looking at the close tolerances of the light keeper's house on Portland Head give me the shivers. It's instantly recognized - the light being as iconic as it is - so getting it right is important.
But it's nice to have artwork to look at and work from.
Monday, January 31, 2011
Sunday, January 30, 2011
Pressing Matters
The tile making process took another big step ahead this weekend with the building of my tile press. I'm no engineer, but I have to say I'm rather pleased with this effort. As with any other project like this, I sort of designed it as I bought the parts. It's not the most efficient way of doing things, but when it comes to any sort of machine work, I tend to do better learning the ropes while I do things.
I knew I needed an arm with a spring for return. I also knew I needed an upright for the arm to pivot in. Then there is the press foot. Those were the essential three pieces for the press. Once I had them in place, I discovered that a guide arm would be necessary to keep the press foot from swinging as it raised and lowered. I would also need to figure out where I wanted the action to start and finish.
It was actually a lot of fun to observe this simple machine in action and determine what enhancements would be needed. It was worth the four trips to the hardware store it necessitated.
Potters may notice that the arm and press foot are made of parts from an old Bailey hand extruder. I modified them by drilling a few holes and moving parts around a bit.
Drilling through tool steel with a hand drill is such fun. But if you're looking for a handy shop tip, here is a great discovery I made: olive oil makes a great cutting oil.
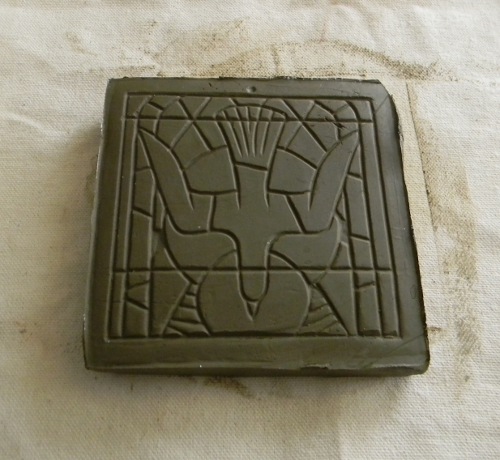
This press will work best for smaller tiles. There are better methods for making larger ones and I will be making molds for those in the near future. What I have to set about doing now is making originals to cast molds from. In my last post, I included a picture of the first die I made. It's rather big for a press like this unless working with pretty soft clay. Still, I gave it a try to see how the process works. Here is the result (before edge cleaning).
Not at all bad for a very first attempt.
Regarding originals from which to cast dies, I have started artwork on a series of tiles featuring lighthouses in Maine. They will be mosaic in design like the dove tile above. While there is still quite a bit to do on it, here is a preliminary layout for a tile featuring Whaleback Light. I sill want to add rocks to the foreground and clouds to the sky. The clouds will obscure the moon a bit for effect.
Mind you, the typeface will change. It's just there as a place holder, but I do plan on putting the name of each light on the tile.
But things are once again off and running!
Monday, January 24, 2011
To Die For...
I knew that making tiles would require a fair amount of study on my part. I wasn't wrong.
It wasn't the clay work that proved tricky. I have plenty of experience with clay and know how it behaves. Mind you, that doesn't stop a person having to learn the best way to keep a small slab from warping. That's something that clay likes to do under most conditions and figuring out how to keep it from happening has been the work and source of frustration of potters since someone said, "Hey look! If you line a basket with this sticky mud it will hold water!" There are techniques to stop warping and I know a few of them.
But where I had a lot to learn (and still do) is in plaster work. Mixing and pouring a wedging table is not that difficult once you get the math out of the way. But working in smaller quantities is a little trickier. See, the problem is that all plasters come with what is called a "use consistency." It is expressed as a number, and the use consistency of the plaster I have been working with is 70. What that means is that for the strongest possible end product, I have to mix 70 parts water for every 100 parts plaster.
By weight. Go figure. And figure I did. Long and short, I came to the answer by two routes. The first was to take someone's word for it that I needed 2.85 pounds of plaster for each quart of water. The second was to weigh a quart of water and calculate it myself. A quart of water weighs 2 pounds. Dividing 2 by 0.7 gave me...2.85. I'm a believer now. My algebra teachers would be so proud.
All of this is because making tiles first requires me to make a mold. The mold - or in this case the die - is used to stamp a consistent pattern on each tile. if you want to make tiles in any sort of production model, you need to do it this way. Hand carving each tile would take far too long to be practical.
The mold I wanted to make was a die mold. This type of mold is pressed into the clay to create a shape or, in this case, an impression. That meant hand making an original to make the mold from. Remember that tile I thought I'd make for the holiday season? It's a few entries down. I did make the original but ran out of time before I could put tiles into production. So I decided to put that project to next year.
Just as well. The process of learning to make the mold, while moving along nicely, is still a work in progress. But there has been progress! Here is a picture of the original and the die mold that I made from it just this evening:
The original was warped, so this die can't be used for production, but the mold form I made is ready as soon as I have a good, flat original. At least I have the process under control now. It will be full steam ahead very soon.
I have a number of ideas for tile series and will be working on the artwork for them starting next week. For now, I have other issues to concentrate on and concentration is proving difficult as I try to stay warm in the icebox that Maine has become. It happens almost every year at this time, but still it always seems to catch me up a little short.
More soon!
Sunday, December 26, 2010
Pouring Complete!
The biggest step in building a wedging table happened this afternoon. I poured the plaster.
Actually, the wedging table has taken somewhat longer to build than I thought it would. I'd like to blame that on the holidays and winter in general, but in truth, it's just been a slow process. I underestimated the amount of plaster I would need for one thing. That and the fact that I'm no carpenter. But somehow it came together.
Here are a couple of pictures taken this afternoon as I did the pour. Plaster has to be mixed very carefully and in the correct proportions in order to get the best strength and absorbent properties out of it. And each kind of plaster (there are many different kinds) has its own mixing ratio. Thankfully, potters are a verbose lot and willingly share their knowledge on things like this so the information was not hard to find. This particular table required 9 gallons of water and about 95.5 pounds of plaster. But it's what I wanted and will be in use as soon as the plaster has cured and I have covered it with heavy canvas.
This shows the table with half the plaster poured:

And here is the table later in the day with the pouring completed. I doubt I will be moving the table again. At least not without help.
Actually, the wedging table has taken somewhat longer to build than I thought it would. I'd like to blame that on the holidays and winter in general, but in truth, it's just been a slow process. I underestimated the amount of plaster I would need for one thing. That and the fact that I'm no carpenter. But somehow it came together.
Here are a couple of pictures taken this afternoon as I did the pour. Plaster has to be mixed very carefully and in the correct proportions in order to get the best strength and absorbent properties out of it. And each kind of plaster (there are many different kinds) has its own mixing ratio. Thankfully, potters are a verbose lot and willingly share their knowledge on things like this so the information was not hard to find. This particular table required 9 gallons of water and about 95.5 pounds of plaster. But it's what I wanted and will be in use as soon as the plaster has cured and I have covered it with heavy canvas.
This shows the table with half the plaster poured:
And here is the table later in the day with the pouring completed. I doubt I will be moving the table again. At least not without help.
Once this is finished, the work can begin!
Saturday, December 18, 2010
New Link
I have put something new up on the web site. A number of people have contacted me looking for information on available products. Since my phone number is a cell phone and I'm not always (read not usually) at the workshop, it's not always easy to get that information to people when they want it.
So, by way of a workable solution, I decided to put up an inventory page so that people can see what is available right away.
Right now I am hard at work on a replacement for the rather basic HTML web site that I currently have up. The new site, which will have the exact same web address as the current one, will also have a complete online shop with a shopping cart. Orders can be placed through the site if customers wish to do that.
I like talking to my customers, and with so many products and options I can't see that relationship changing. Pottery is a very personal thing and getting it just right is always the goal.
Please do check out the Lowell Hill Pottery Inventory Page.
Thursday, December 16, 2010
Taking Shape
Well, it's officially winter. There is snow on the ground...sort of...and it's cold. The house is finally banked, the plastic is up on the windows, the house is still rather cool though not uncomfortably so, and the cat is now insisting on sleeping under the covers. We both love flannel sheets and she is far more efficient than a hot water bottle.
Of course, the water is now drained out at the pottery. With no heat in the building there is nothing going on. I am now working on the studio space in my house.
It's a small house, but here is what is happening.
I decided that the corner of the kitchen that was intended for eating just wasn't going to get used for that purpose. It never has been. I prefer to eat in the living room and that is where I serve guests as well. So the kitchen table and the area it occupies has been collecting junk for a long time. If I have no place to put something - or more likely, if I just can't bring myself to toss out something I am not using - it gets piled somewhere until I can't stand it anymore.
Well, I decided I couldn't stand the pile int he kitchen any longer, so a lot got carried to the dump. What remained found new quarters elsewhere in the house. That left a nice area for a small clay studio. There was the issue of the wall-to-wall carpeting. I saw no sense in keeping carpet where I would be using clay and water, so I tore it up and removed it.
Have you ever taken up wall-to-wall carpet that has been in place for over 20 years in a high traffic part of a house? I'll spare you the gory details, but it was one entire day's labor to get the mess cleaned up.
Anyway, that left me with a nice (?) bare floor where the studio would go. Building the work benches would come next. I have built one work bench and will soon be able to start putting out small items like napkin rings and jam jar lids. Items like that are small enough to do in this space and can be carried to the pottery to be fired. Here is a picture of the studio space so far:
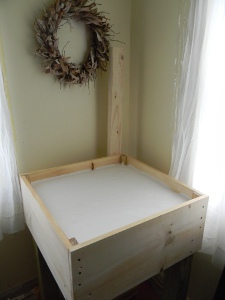
Yes, that's crappy plywood flooring. Not everyone can find beautiful hardwood floors under the carpet (like so many people I have known did). The first work bench I built is on the left in this picture. Right now, it holds all the tools currently being used, but most notably it has the extruder mounted at the right hand end. This is used to make napkin rings and handles for most pots that require them. To the right in this picture is the wedging table I am now building. Here is a close shot of that:
The well in the top of this table will be filled with plaster soon and the whole thing will be covered with canvas. Before I can do that, though, I will need a few more tools and another 50 pounds of plaster to add to the 50 I already have.
Yeah, it's going to be heavy. But that's the point.
After these benches are finished, I will build one more for making tiles and then I will be in business again. Pictures will be forthcoming.
Google-licious: I tried Googling "Lowell Hill Pottery" today. I seem to have done something right!! The entire first page consisted of hits on my web site! Try it out for yourself. Then have a look around. I am currently building a new site complete with an Internet store and shopping cart. My hope is to launch that in the early spring if not before.
I'll keep you posted.
Of course, the water is now drained out at the pottery. With no heat in the building there is nothing going on. I am now working on the studio space in my house.
It's a small house, but here is what is happening.
I decided that the corner of the kitchen that was intended for eating just wasn't going to get used for that purpose. It never has been. I prefer to eat in the living room and that is where I serve guests as well. So the kitchen table and the area it occupies has been collecting junk for a long time. If I have no place to put something - or more likely, if I just can't bring myself to toss out something I am not using - it gets piled somewhere until I can't stand it anymore.
Well, I decided I couldn't stand the pile int he kitchen any longer, so a lot got carried to the dump. What remained found new quarters elsewhere in the house. That left a nice area for a small clay studio. There was the issue of the wall-to-wall carpeting. I saw no sense in keeping carpet where I would be using clay and water, so I tore it up and removed it.
Have you ever taken up wall-to-wall carpet that has been in place for over 20 years in a high traffic part of a house? I'll spare you the gory details, but it was one entire day's labor to get the mess cleaned up.
Anyway, that left me with a nice (?) bare floor where the studio would go. Building the work benches would come next. I have built one work bench and will soon be able to start putting out small items like napkin rings and jam jar lids. Items like that are small enough to do in this space and can be carried to the pottery to be fired. Here is a picture of the studio space so far:
Yes, that's crappy plywood flooring. Not everyone can find beautiful hardwood floors under the carpet (like so many people I have known did). The first work bench I built is on the left in this picture. Right now, it holds all the tools currently being used, but most notably it has the extruder mounted at the right hand end. This is used to make napkin rings and handles for most pots that require them. To the right in this picture is the wedging table I am now building. Here is a close shot of that:
The well in the top of this table will be filled with plaster soon and the whole thing will be covered with canvas. Before I can do that, though, I will need a few more tools and another 50 pounds of plaster to add to the 50 I already have.
Yeah, it's going to be heavy. But that's the point.
After these benches are finished, I will build one more for making tiles and then I will be in business again. Pictures will be forthcoming.
Google-licious: I tried Googling "Lowell Hill Pottery" today. I seem to have done something right!! The entire first page consisted of hits on my web site! Try it out for yourself. Then have a look around. I am currently building a new site complete with an Internet store and shopping cart. My hope is to launch that in the early spring if not before.
I'll keep you posted.
Monday, November 22, 2010
The Deed is Done
This morning on my way to that full-time job of mine, I could not help but notice the flakes of snow flying into my windshield. There weren't very many of them and the weather quickly turned to rain, but it was cold out.
It's not exactly throwing in the towel, but I stopped in at Blue Hill Plumbing and Heating and asked them to turn off the water for the winter. So it's done. I'm firing a kiln today and will continue to do that over the winter as I produce tiles at home. I'm even thinking of finding a low-cost (used?) wheel and bringing the extruder home so that I can continue to make napkin rings during this 'dark side' of the year. Not sure as yet.
I'm pushing my plans for a holiday tile into next year. I still have a lot to learn about working with plaster - at least in the die making department - and I have spent a lot of time filling orders and solving problems this year. All of those projects have ended successfully, so I'm sure the tile shop will do as well. But now is not the time to be adding new stresses. It's the time for planning and thinking.
I'll be taking orders over the winter for springtime production. The web site is now up and running although there are still many additions to put up. Please have a look at the Lowell Hill Pottery site and let me know what you think.
Until sometime very soon...
Subscribe to:
Posts (Atom)