Well, as far as weather is concerned, I guess seasons are a little confused in these parts this year. It is almost November 30, and although the furnace is running as I write, it isn't having to work all that hard. Temperatures are into the 50s still. Colder weather is predicted, but not that much colder.
I'm not complaining.
The holiday season should arrive on time regardless of weather, though. With that in mind, I have added a complete list of all inventory currently available from Lowell Hill Pottery. Check out the Lowell Hill Pottery Inventory Page. Most items currently available are in the less expensive range too. Simplified gift giving is but a click away!
Stay warm and safe. More later on.
Tuesday, November 29, 2011
Thursday, November 24, 2011
'Tis the Season
It's Thanksgiving Day and I'm doing just what I promised myself I would do. I'm kicking back, relaxing and snuggling with my cat. I have been putting DVDs into the player one after another and generally taking it easy for the day.
I think I deserve it. This past season was quite an experience. Business picked up somewhat stronger than I anticipated - which is a good thing. I'm ahead of where I thought I'd be, but to put that into perspective, I didn't think I'd do a whole lot. This is only year two of a start-up after all. But it's encouraging to know that Rowantrees customers are finding me.
We have finally seen snow of a rather serious nature and the temperatures, while still very mild for this time of the year, have started to act less predictably and have dipped into the 20s on occasion. So I had the pipes drained out and figured I would stop production for the winter. Then I got an order. And then another one. And yet a third.
So back in I went - carrying water in buckets so that I could glaze. I didn't mind at all even though it really was getting cold. But now that those orders are finished and on their way, I really do have to call it for this winter. My hands really suffered from working in water under the cold conditions.
I do have a good deal of pottery available and will be putting up an inventory list on the web site over the weekend. This will show exactly what I have right now and in what colors in case anyone wishes to place an order. I can certainly go in, pack something and then send it out. Believe me, it's no problem. I just can't throw or glaze anything until the weather warms up again.
I fired an entire kiln of Ducks Head and Moss Agate this week. Remember what I said about having to learn about Ducks Head (or any glaze for that matter) once it is formulated? Well... I have pretty well mastered the Ducks Head and Turquoise combination. Combining Ducks Head with Moss Agate is another matter entirely. I got what I needed to get out of the kiln, and those pieces look lovely. But a lot of the rest of it will be found on the "Irregulars" shelf next summer. Once the weather warms up again, the tweaking and learning will begin. That's how it goes.
For the coming months, I will be working again on the tile project. I had to suspend work on that to build my stock at the pottery. I started from nothing on that this year once I decided that I could not use the old Rowantrees bisque stock. The labor to replace all of that pottery was pretty intense but that was where the demand was.
Now I can shift gears and work at home. I purchased a small wheel and am putting a bench together for that. The tile press is being liberated from a summer's worth of junk mail and assorted tools, and the extruder will come home again this season so that I can make more napkin rings.
It all sounds like a plan.
Sunday, October 30, 2011
The Return of Ducks Head

And it's premature to suggest that I have reached th end of that road on this one. in fact, every glaze I have formulated will be in the "tweaking" stage for a long time to come. That is no less true of Ducks Head. In addition, this particular glaze is very finicky with regard to application. Like Heather Blue, there is a fine line between too thin and too thick. Experience and practice will take care of that.
Of course, the cruel irony in that is the fact that the cold weather is rapidly approaching. As I write this, we are having our first snow storm. Check out the date on this post. We do expect things to get better for the next week or so, but I'm getting the hint. It will be time to shut down the studio and drain the water pipes very soon. To compensate, I'm doing as much glazing in Ducks Head and Ducks Head & Turquoise as I can so that I can have at least a modest stock of items. I'll be focusing on mugs and other small items.
When I do close the studio for the season, I'll be posting a complete inventory list on the web site so that people cans ee what is available in the off season. In addition, I'll be working in my home studio producing some items as well.
It's time to go back to the tile project now.
Coming up: Building a new studio in 2012...?
Saturday, October 29, 2011
In Time for the Holidays!

The Web outage didn't last long, but someone did have to push a Big Red Button to get things squared away. Honestly, software that likes to add irrelevant bits and pieces without consulting me just boggles my mind.
But enough of technical woes. The web site is functioning just fine now thanks to the folks at DailyRazor.com.
I'm very pleased to announce that the Cutout Candle Holder is available just in time for the Holiday season. I have made a limited run of these popular candle holders in the new Evergreen glaze and they are expected to sell quickly.
The Cutout Candle Holder was originally created by Sheila Varnum at Rowantrees as a means of salvaging pint pitchers that had not survived the trimming process. Occasionally the spout would split making the pitcher impossible to complete. If that happened, Sheila would cut the top portion of the pitcher off and cut designs out of the side. The evergreen tree design was the most popular and gives off the most light even from a small candle.
As with all my products, these holders are made one at a time by hand. The tree images are cut out freehand. Each piece is unique and the new Evergreen glaze is eye-popping.
This edition is available in the Evergreen glaze only. If you are interested, they are $35 each or a pair for $60. You can order them on the Lowell Hill Pottery web site.
Next item up for discussion: Announcing the new Ducks Head glaze!
Thursday, October 20, 2011
The Web Site is Down...Temporarily
And only temporarily. Technical glitches happen just like...that other thing that happens now and then. This morning, I discovered that my web site turned into an "INTERNAL SERVER ERROR" some time during the night. A support ticket has been generated and I expect the problem will be corrected pretty quickly. The hosting service I use is generally very responsive to these issues.
My apologies if this problem is inconveniencing you. The email address is working, so you can contact me at office@lowellhillpottery.com if you need anything.
Of course, things like this choose the worst possible times to happen. I am just about to announce that Ducks Head Black is FINALLY back! I will detail that one in the next post along with an announcement of a holiday special.
Then there is the matter of my Established Customer discount program. I'm putting the final touches on that one and will announce it in the next week or so. So keep an eye on this blog. Things are in motion!
Sunday, September 25, 2011
Closing in on Duckshead
The saga continues. Duckshead remains elusive, but a battery of tests has provided about the best leads to date. I started with the Moss Agate formula as a base. It is the glossiest, glassiest of the glazes and flows nicely. This is particularly important because it has to flow well when combined with the Turquoise glaze to make the most popular pattern of Duckshead and Turquoise. The Turquoise has been undergoing some of its own improvements over the summer as well so that it can be more glassy. So far so good.
The next step in finding a Duckshead has been to figure out what combination of metallic oxides will create black with the silver sheen that characterizes this unique glaze. Black is not at all difficult to get all by itself. I have created several of them int he last few months. But that metallic sheen is another story. It's subtle, providing a silvery look while remaining shiny. Many black metallic glazes tend to take on a "gun metal" appearance. That's pretty in itself, but the dull surface can often mean that the glaze is soft and will easily leach some of the oxides that give it its color. Leaching may not be dangerous, but the pottery will lose its luster and shine quickly.
And some of those oxides can, in fact, be dangerous if too much leaches.
So the secret is to get enough to do the job without overloading. That is what has been taking so long. The base glaze is now in place, and the process of coloring has begun. Recently, I created to triaxial blend sets - one composed of iron, copper and cobalt oxide and the other of manganese, copper and cobalt. These were blended in a series of combinations and the results were studies by both me and Sheila Varnum.
Here is a picture of the iron-based triaxial series

And here is the manganese series

They all look pretty similar in these photos, but believe me, there are marked differences. In the end, we chose one from the second series. It is the second from the left in the first row. This one has a beautiful metallic sheen and, with some adjustments to the other oxides, should make a beautiful Duckshead.

Of course, I've said stuff like this before. There are other issues to consider. The glaze must not only look nice in a dip test. It has to suspend well in water and apply well. Application has been the downfall of several attempts over the summer, but I have great hope for this one given that its base formula is already well tested. Earlier tests of a similar Duckshead test were very nice. Just not quite the color we wanted.
The test will be in the fire this week. If it looks good and passes the various tests for durability, you will find it out here.
And I will be VERY busy glazing until the snow falls.
Thursday, September 1, 2011
Fair Update

More on the Fair later!
Saturday, August 27, 2011
It's Fair Time Again!
Ok, time for an update. It has been a while since the last post, and more than a lot has happened.
The summer has been good. Things have gone at least as well as I hoped they would and so far I'm still on my feet. It's time once again for the Blue Hill fair, and I will again have a display in the main Exhibition Hall. It's very exciting, and I am planning the best display of the three I have done so far. Once it is set up, I'll post a picture here.
So, what else have I been up to? Well let's see. I've been throwing, trimming, glazing and firing pots. I have been doing glaze tests by the dozen (more on the search for a Duckshead in a bit), and yes, selling pots.
I'm exhausted, but very happy with the way things have gone so far. Many old Rowantrees customers have been in to talk. It's always great fun to share memories of Rowantrees from all sides. People are glad that the tradition is being carried forward and they have all expressed their approval of the wares I am producing.
Whew!
I had another challenge recently in the form of an order for something I had not yet produced. Last year it was a large tea pot. This year, it was a small tea pot. Tea pots are probably the most difficult form for the potter because each is made up of three separate pots; the pot itself, the lid and the spout. Each is thrown in isolation from the others, but they must be assembled in a way that results in a harmony. If that harmony fails to materialize, the potter has wasted his time.
You be the judge.
 That's actually a coffee cup in the picture, not a teacup. But you'd still get two of those out of that pot.
And now, Duckshead. Ah, Duckshead. How I have worked, experimented, tested and oh, how close I have come. Really. I have said it won't be long, and I still believe that. I knew black was a difficult "color" for a glaze, but a black that has to have a metallic luster to it is even more difficult. I am close. So very close.
But glazes have to do a lot of things. Looking good out of the kiln is but one of them. I have had a procession of them that looked great in the initial tests, but didn't suspend well in water, or didn't apply well with the spray gun, or failed to "flow" they way they should, or were too matte, or didn't have the metallic sheen, or...
And that doesn't even include the battery of tests that glazes have to pass before I will pass them for production.
It's coming. Have faith if you are still waiting for it. I do. it will come.
The same is true of Evergreen and Seagull Gray, But Duckshead first.
The summer has been good. Things have gone at least as well as I hoped they would and so far I'm still on my feet. It's time once again for the Blue Hill fair, and I will again have a display in the main Exhibition Hall. It's very exciting, and I am planning the best display of the three I have done so far. Once it is set up, I'll post a picture here.
So, what else have I been up to? Well let's see. I've been throwing, trimming, glazing and firing pots. I have been doing glaze tests by the dozen (more on the search for a Duckshead in a bit), and yes, selling pots.
I'm exhausted, but very happy with the way things have gone so far. Many old Rowantrees customers have been in to talk. It's always great fun to share memories of Rowantrees from all sides. People are glad that the tradition is being carried forward and they have all expressed their approval of the wares I am producing.
Whew!
I had another challenge recently in the form of an order for something I had not yet produced. Last year it was a large tea pot. This year, it was a small tea pot. Tea pots are probably the most difficult form for the potter because each is made up of three separate pots; the pot itself, the lid and the spout. Each is thrown in isolation from the others, but they must be assembled in a way that results in a harmony. If that harmony fails to materialize, the potter has wasted his time.
You be the judge.

And now, Duckshead. Ah, Duckshead. How I have worked, experimented, tested and oh, how close I have come. Really. I have said it won't be long, and I still believe that. I knew black was a difficult "color" for a glaze, but a black that has to have a metallic luster to it is even more difficult. I am close. So very close.
But glazes have to do a lot of things. Looking good out of the kiln is but one of them. I have had a procession of them that looked great in the initial tests, but didn't suspend well in water, or didn't apply well with the spray gun, or failed to "flow" they way they should, or were too matte, or didn't have the metallic sheen, or...
And that doesn't even include the battery of tests that glazes have to pass before I will pass them for production.
It's coming. Have faith if you are still waiting for it. I do. it will come.
The same is true of Evergreen and Seagull Gray, But Duckshead first.
Friday, July 22, 2011
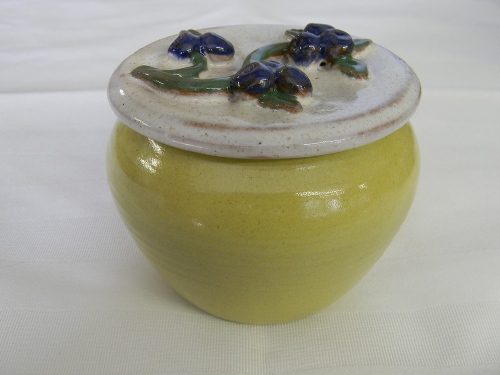
The Return of Jonquil Yellow
Customers have a way of keeping me on my toes. Every now and then I wish I could get one step ahead of them, but I think it's better to let them lead on occasion.
So it is with color. I had a plan for the order of things where it came to reformulating the Rowantrees glazes. I would start with the most popular colors and combinations and then work on those that sold less well historically. Some I wouldn't bother with at all for the time being. I set about working on what I think of as the essential palette of Oyster White, Heather Blue, Turquoise, Moss Agate and Ducks Head. I was deep in the Ducks Head process (you can expect an announcement very soon!) when I got a note from a customer asking about Jonquil Yellow.
Yellow? Ok. Jonquil Yellow it is.
To be honest, yellow is not one of my personal favorites, and it never really sold well when I was at Rowantrees. But people did buy it and those who did really loved it. And before I knew it, at least two other people had asked about it.
It really didn't take long. In fact, I got a great Yellow out of the first batch of tests. And because it is based on the Oyster White formula, I know already that it will fit the clay body without complaint. So production in Yellow has started. Here is a sample form that first test set.
 Make exception for the daylight lighting. There will be far better photography when the next load comes out of the kiln.
So, high on my achievement, I announced to the customers who had asked about it that the Yellow was again available. I haven't heard anything from them as yet,
But three people have since come into the shop to ask if I had anything in Evergreen.
So it is with color. I had a plan for the order of things where it came to reformulating the Rowantrees glazes. I would start with the most popular colors and combinations and then work on those that sold less well historically. Some I wouldn't bother with at all for the time being. I set about working on what I think of as the essential palette of Oyster White, Heather Blue, Turquoise, Moss Agate and Ducks Head. I was deep in the Ducks Head process (you can expect an announcement very soon!) when I got a note from a customer asking about Jonquil Yellow.
Yellow? Ok. Jonquil Yellow it is.
To be honest, yellow is not one of my personal favorites, and it never really sold well when I was at Rowantrees. But people did buy it and those who did really loved it. And before I knew it, at least two other people had asked about it.
It really didn't take long. In fact, I got a great Yellow out of the first batch of tests. And because it is based on the Oyster White formula, I know already that it will fit the clay body without complaint. So production in Yellow has started. Here is a sample form that first test set.
So, high on my achievement, I announced to the customers who had asked about it that the Yellow was again available. I haven't heard anything from them as yet,
But three people have since come into the shop to ask if I had anything in Evergreen.
Monday, July 11, 2011
The Recycling Thing
One of the great things about pottery is the fact that so much of the materials we use can be recycled. Of course, that can be a challenge as well.
In late May I took delivery of one ton of clay. I remember wondering if I would be able to use it all before the cold weather sets in. I didn't want to have to lug too much clay home, sut I would do that and store it in the cellar to keep it from freezing.
Well, it is now less than two months later and I am down to 700 pounds of the original purchase. Now the angst is generated by wondering if I will have enough clay to get me to the cold weather or if I will have to get more. But in fact, I probably won't. Clay can be recycled!
A lot fo the clay used to throw a pot is trimmed off a few days later. After all, pots have a top side and an underneath. Ever wonder how the bottom of a pot happens? Pots are dried until they are stiff - 'leather hard' is the term most potters use. Once they reach that stage, pots can be turned over, placed back on the wheel and their undersides carved with special tools to make the "foot". Of course, that results in trimming scrap.
Lots of it. And all of it reclaimable. I have gone low tech with this and decided to use a simple method. Clay always seems better to me when it has been reduced to a slurry for reprocessing. So trimming scrap is mixed with water to the consistency of yogurt. I mix the slurry using a drill mixer until it is smooth and then pour it into an evaporation table. The table is about 2 feet by four feet and has a plaster tub for a top.
Or at least, it will when I'm finished building it. Here it is as it currently stands:
 This was today's project. In a couple of days, I will mix plaster and pour a tub top. The plaster surface will be covered with duck canvas, and the clay slurry will be poured into the canvas-lined tub. After a few days, the clay can be cut into bricks and set out to stiffen a little more before pugging and storing. That should keep me in clay for the rest of the season. It may even give me sufficient to work at home over the winter.
Maybe...
In late May I took delivery of one ton of clay. I remember wondering if I would be able to use it all before the cold weather sets in. I didn't want to have to lug too much clay home, sut I would do that and store it in the cellar to keep it from freezing.
Well, it is now less than two months later and I am down to 700 pounds of the original purchase. Now the angst is generated by wondering if I will have enough clay to get me to the cold weather or if I will have to get more. But in fact, I probably won't. Clay can be recycled!
A lot fo the clay used to throw a pot is trimmed off a few days later. After all, pots have a top side and an underneath. Ever wonder how the bottom of a pot happens? Pots are dried until they are stiff - 'leather hard' is the term most potters use. Once they reach that stage, pots can be turned over, placed back on the wheel and their undersides carved with special tools to make the "foot". Of course, that results in trimming scrap.
Lots of it. And all of it reclaimable. I have gone low tech with this and decided to use a simple method. Clay always seems better to me when it has been reduced to a slurry for reprocessing. So trimming scrap is mixed with water to the consistency of yogurt. I mix the slurry using a drill mixer until it is smooth and then pour it into an evaporation table. The table is about 2 feet by four feet and has a plaster tub for a top.
Or at least, it will when I'm finished building it. Here it is as it currently stands:

Maybe...
Sunday, July 3, 2011
Open Sesame!
The shop is now open. During July and August, I will be open two weekdays each week as well as Saturdays, afternoons and by appointment. I will be posting a detailed schedule soon, so check back! For starters, I will be in the shop on July 4th. Have a wonderful holiday everyone!
Oh! And I finally came up with a logo for my business. Here is it:

This image is my rendition of a Mountain Ash tree. Since I make reproductions of Rowantrees Pottery, I decided to use an image of a Rowan or European Mountain Ash. I chose a folk art style to represent the New England simplicity that Rowantrees embodied. As of this writing, I am now working on a sign to put out in front of the shop.
Busy, busy, busy!
Oh! And I finally came up with a logo for my business. Here is it:
This image is my rendition of a Mountain Ash tree. Since I make reproductions of Rowantrees Pottery, I decided to use an image of a Rowan or European Mountain Ash. I chose a folk art style to represent the New England simplicity that Rowantrees embodied. As of this writing, I am now working on a sign to put out in front of the shop.
Busy, busy, busy!
What a Difference a Clay Makes!
Well, the change to a new clay has proven to be an incredibly good decision. Let's see if I can remember all of this off the top of my head...
In only four weeks of production, I have thrown:
60 Jam Jar Lids
114 Jam Jars
50 Jumbo Mugs
50 Coffee Mugs
60 Cocoa Mugs
100 small Saucers
30 Dinner Plates
30 Luncheon Plates
80 Bud Vases
12 small Cream and Sugar Sets
24 large Cream and Sugar Sets
12 large Covered Baking Dishes
50 Bread & Butter Plates
12 Butter Covers
30 Chowder Cups & Saucers
50 Ramekins
12 Pasta Bowls (Actually, I made more than that but had to throw some out)
If I wasn't so excited about this, I'd be exhausted. But it's amazing what you can do if you don't have to focus any energy on fighting with your raw materials.
Well, for the most part.
A new clay carries a few surprises with it.The process of discover and recover goes on, but the issues that arise are not unfamiliar ones to any potter.
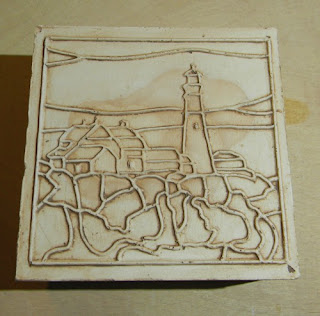
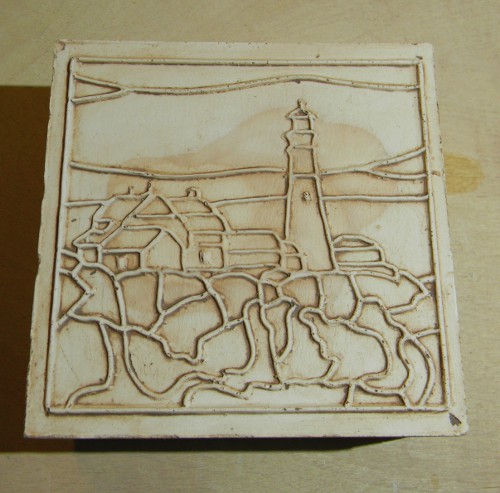
In addition to the activity at the pottery itself, I have been moving forward with tile project at home. Here is a picture of a small run of the Portland Head Light tiles. They have been coated with a thin layer of white slip (called an engobe) that will make decorating them easier. They aren't in production just yet, but it won't be long. I have come a long way with them but there is a ways to go.

In only four weeks of production, I have thrown:
60 Jam Jar Lids
114 Jam Jars
50 Jumbo Mugs
50 Coffee Mugs
60 Cocoa Mugs
100 small Saucers
30 Dinner Plates
30 Luncheon Plates
80 Bud Vases
12 small Cream and Sugar Sets
24 large Cream and Sugar Sets
12 large Covered Baking Dishes
50 Bread & Butter Plates
12 Butter Covers
30 Chowder Cups & Saucers
50 Ramekins
12 Pasta Bowls (Actually, I made more than that but had to throw some out)
If I wasn't so excited about this, I'd be exhausted. But it's amazing what you can do if you don't have to focus any energy on fighting with your raw materials.
Well, for the most part.
A new clay carries a few surprises with it.The process of discover and recover goes on, but the issues that arise are not unfamiliar ones to any potter.
In addition to the activity at the pottery itself, I have been moving forward with tile project at home. Here is a picture of a small run of the Portland Head Light tiles. They have been coated with a thin layer of white slip (called an engobe) that will make decorating them easier. They aren't in production just yet, but it won't be long. I have come a long way with them but there is a ways to go.

Wednesday, June 1, 2011
The Clay Has Arrived!
Well, it was two weeks later than expected, but the clay finally arrived. One ton - 2000 pounds - sitting in the driveway when I got to the pottery after work last Thursday. One ton of clay doesn't take up a lot of square footage. It looked pretty small sitting there, piled three boxes high in places, sitting on a palette and wrapped in that extra sticky plastic that keeps loads from shifting in the back of a delivery truck. But trust me when I say that there was a lot of clay.
To get it inside, I had to unstack it in the driveway first. The floor in the clay room tends to be damp, so putting the boxes directly on the floor would be a bad idea. That meant getting the palette out from under the stack. I haven't been in the gym for a month, so the exercise seemed like a good idea. I took great care to use mu legs rather then my back in lifting. Even though it's only fifty pounds at a time, it's a lot of fifty-pound lifts - specifically 40 of them - to get to one ton. The boxes were stacked a few feet over from the original pile, then I took the palette in and found a good spot for it in the clay room. Two ramps, one wheelbarrow and twenty trips later, all that clay was sitting indoors right by the pug mill.
Then I started reminiscing.
I had cleaned the pug mill out very carefully to avoid mixing any old clay in with the new. A little mixing is inevitable given that this particular machine has been in operation since the 1940s. It was built by the Crosley Machine Company of Trenton, NJ, which no longer exists. But they built this beast to last a very long time and with very little maintenance, it has done just that. Come the day that I move into my own digs, I won't be able to take this machine with me because its footprint is too big and I won't have the required three-phase power to run its motor. I will dearly miss it.
They built machines to last back when Rowantrees was first getting started. Still in residence at the pottery are the original filter press and pug mill from Crosley. The pug mill is still going strong, its huge 5 hp motor purring like a kitten and its gears meshing as well now as they ever did. You don't find many like them in the world these days.
 The flywheel on the mill at Rowantrees is a lot larger than this illustration, and there is no clutch, but materially it is the same machine. The barrel holds about 150 pounds of clay and I would estimate its output at a good 600 pounds an hour (Crosely said 1 ton per day).
It has never broken down. Not once. Never. It requires grease from time to time, but that's it.
The filter press has had a somewhat more troubled past, but it has a lot more moving parts. And really, it's the pump that had most of the problems. Most of those problems stemmed from the fact that those of us using it on a regular basis were not machinists and consequently didn't quite know how to relate to it. So a small leak around the piston packing got fixed by putting in more packing. The occasional pebble that made it through the screening process might cause a valve to stick open. And the blankets could get creased easily, which would lead to a high-pressure spray of clay that could hit ceiling and windows before anyone knew what was going on. It led a merry chase now and then, but was generally faithful to its mission. I can still hear it's gentle whirr and thumping noises as the giant piston moved clay slip out of the tank and into the press. A few minutes of that would be followed by the sound of rain as water started raining and then dripping from the blankets. Three hours of that, and the clay cakes inside were usually ready for pugging and storage.
 A tank beneath the press caught the excess water, which would be pumped back into the mixing tank and recycled for the next batch of clay. This illustration does not feature some options that the Rowantrees press has, like a relief valve that maintained a steady pressure of 80 psi.
Usually. It was a valve. Pebbles, you know.
The last time I used the press was probably sometime in 2008. I recall running a couple batches of clay through it without any fuss. But it has sat dormant ever since. By now the piping and valves are probably encased in dry clay. To operate the press now would require me to disassemble it, clean it and rebuild it. Time does not permit.
Rowantrees used local clay that usually came from local contractors. When I first arrived in Blue Hill, the clay supply had come from a local school construction project. It was unearthed when the foundation hole was dug. The problem with clay like that is that it is mixed with rocks, gravel and top soil, all of which has to be removed. Hence this process.
There are other ways of refining local clay that are less machine and labor intensive. They all require using clay that is dug from a much deeper depth and is consequently more pure. The potteries I know of that still use local clay use very pure deposits. Rowantrees never owned its own clay field, so the process is used was necessary.
But when you are a one-person operation, you have to choose how you will spend your time. I can mix and process clay or throw it on my wheel. Given the additional safety issues with mixing and processing clay, I decided long ago to switch to a commercial clay body. There are reasons beyond time in the shop, but I discussed those some time ago in earlier posts.
Despite this change in the traditional Rowantrees process, some continuity remains. The clay I have chosen is manufactured by the Standard Ceramic Supply Company of Pittsburgh, PA. Throughout its history, Rowantrees bought its raw glaze materials from Standard. Now the clay comes from them as well.
I have been throwing since last Friday. So far, I have produced 60 jam jar lids, 116 jam jars, 50 jumbo mugs and 60 cocoa mugs. I trimmed the jam jars today and will start on the large mugs tomorrow. This clay is fantastic to work with and will provide the same deep red color that the local clay did. I am looking forward to further exploration with this stuff.
But for now, I need bisque ware. Off and potting!
To get it inside, I had to unstack it in the driveway first. The floor in the clay room tends to be damp, so putting the boxes directly on the floor would be a bad idea. That meant getting the palette out from under the stack. I haven't been in the gym for a month, so the exercise seemed like a good idea. I took great care to use mu legs rather then my back in lifting. Even though it's only fifty pounds at a time, it's a lot of fifty-pound lifts - specifically 40 of them - to get to one ton. The boxes were stacked a few feet over from the original pile, then I took the palette in and found a good spot for it in the clay room. Two ramps, one wheelbarrow and twenty trips later, all that clay was sitting indoors right by the pug mill.
Then I started reminiscing.
I had cleaned the pug mill out very carefully to avoid mixing any old clay in with the new. A little mixing is inevitable given that this particular machine has been in operation since the 1940s. It was built by the Crosley Machine Company of Trenton, NJ, which no longer exists. But they built this beast to last a very long time and with very little maintenance, it has done just that. Come the day that I move into my own digs, I won't be able to take this machine with me because its footprint is too big and I won't have the required three-phase power to run its motor. I will dearly miss it.
They built machines to last back when Rowantrees was first getting started. Still in residence at the pottery are the original filter press and pug mill from Crosley. The pug mill is still going strong, its huge 5 hp motor purring like a kitten and its gears meshing as well now as they ever did. You don't find many like them in the world these days.

It has never broken down. Not once. Never. It requires grease from time to time, but that's it.
The filter press has had a somewhat more troubled past, but it has a lot more moving parts. And really, it's the pump that had most of the problems. Most of those problems stemmed from the fact that those of us using it on a regular basis were not machinists and consequently didn't quite know how to relate to it. So a small leak around the piston packing got fixed by putting in more packing. The occasional pebble that made it through the screening process might cause a valve to stick open. And the blankets could get creased easily, which would lead to a high-pressure spray of clay that could hit ceiling and windows before anyone knew what was going on. It led a merry chase now and then, but was generally faithful to its mission. I can still hear it's gentle whirr and thumping noises as the giant piston moved clay slip out of the tank and into the press. A few minutes of that would be followed by the sound of rain as water started raining and then dripping from the blankets. Three hours of that, and the clay cakes inside were usually ready for pugging and storage.

Usually. It was a valve. Pebbles, you know.
The last time I used the press was probably sometime in 2008. I recall running a couple batches of clay through it without any fuss. But it has sat dormant ever since. By now the piping and valves are probably encased in dry clay. To operate the press now would require me to disassemble it, clean it and rebuild it. Time does not permit.
Rowantrees used local clay that usually came from local contractors. When I first arrived in Blue Hill, the clay supply had come from a local school construction project. It was unearthed when the foundation hole was dug. The problem with clay like that is that it is mixed with rocks, gravel and top soil, all of which has to be removed. Hence this process.
There are other ways of refining local clay that are less machine and labor intensive. They all require using clay that is dug from a much deeper depth and is consequently more pure. The potteries I know of that still use local clay use very pure deposits. Rowantrees never owned its own clay field, so the process is used was necessary.
But when you are a one-person operation, you have to choose how you will spend your time. I can mix and process clay or throw it on my wheel. Given the additional safety issues with mixing and processing clay, I decided long ago to switch to a commercial clay body. There are reasons beyond time in the shop, but I discussed those some time ago in earlier posts.
Despite this change in the traditional Rowantrees process, some continuity remains. The clay I have chosen is manufactured by the Standard Ceramic Supply Company of Pittsburgh, PA. Throughout its history, Rowantrees bought its raw glaze materials from Standard. Now the clay comes from them as well.
I have been throwing since last Friday. So far, I have produced 60 jam jar lids, 116 jam jars, 50 jumbo mugs and 60 cocoa mugs. I trimmed the jam jars today and will start on the large mugs tomorrow. This clay is fantastic to work with and will provide the same deep red color that the local clay did. I am looking forward to further exploration with this stuff.
But for now, I need bisque ware. Off and potting!
Sunday, May 15, 2011
The Clay is Coming!
I ordered a ton of clay a couple weeks ago, and I'm hoping it will arrive sometime this week. That will kick things off.
A ton may sound like a whole lot of clay but believe me, a potter can go through that much pretty quickly. In one year at Rowantrees I threw exactly 11,000 pieces with an average throw weight of about 2 pounds. That would be about 11 tons in one year, so I'm still working small here.
The signs of spring are beginning to show themselves. The weather is warmer - if wet - and with Mother's Day came my first sale of 2011. It was just a bud vase, but there's something emblematic about selling anything after a hiatus of several months.
It helps.
Research and reformulation are still the top priority, but bisque production will need to start up right along with that. But before any of that can happen, a lot of cleaning up is in store. This week, it starts.
Thursday, April 28, 2011
Survey Sez...
Most statisticians would look askance at anyone drawing conclusions from a small sampling, but sometimes a few people can really shed light where it's needed. Eight people have so far responded to the Lowell Hill Pottery Survey and while I hope more do, I have some data to work with.
I also have work to do!
By a large margin, the most popular glaze color is Ducks Head Black. That's a little surprising to me, but only a little. It is a very unusual glaze with a wonderful character. While it is not yet available for production, its reformulation is the first item on the agenda once I get the water turned back on for the warm season (which I expect to do next week). The science is on paper right now, and I am sure only a few passes will be needed to get a glaze that looks as it should. But then the safety tests will have to be done. Black is a difficult color to formulate and make hard and permanent. But two customers have already called this year to inquire about Ducks Head, so it will take center stage until it is ready to go.
Ducks Head and Turquoise was the next most popular pattern. The Turquoise is all formulated and in production, so once the Ducks Head is ready, this will be a snap.
What really surprised me was the popularity of the Jonquil Yellow glaze. It is as popular as the Turquoise and the Black and Seagull pattern. I have already had on inquiry about it and will begin reformulation very soon. In fact, Yellow is a variant of the white formula, so the base glaze is finished. All I need to do is establish the right amounts of colorant. Then the tests, of course. You have to do the tests.
I am halfway to a good workable Seagull, which I will try along with the new Ducks Head. Rowantrees had stopped using the Black glaze by the time production ceased in 2008, but I am not beyond recreating it. Still, the blue interface between Ducks Head and Seagull is very attractive.
So the plan starting in early May is set. Ducks Head and Yellow need to be addressed.
I will also start bisque ware production. You may recall that I decided to increase the firing temperature last year. This was largely because the glazes were having fit problems at the original firing temperatures on the new clay body. Increasing the temperature a little solved that problem for most of the glazes. But raising the firing temperature caused the older Rowantrees bisque ware to shrink excessively, making the final product too small. For that reason, I abandoned the plan of using up the remaining bisque stock that existed at Rowantrees. I will start from scratch, whis is a bit daunting, but not terribly so.
This move also gives me a chance to advance the firing temperatures even more. The new clay can be fired at much higher temperatures than the old, and the higher I go, the more durable the final product. I see no reason not to head for the top temperature as I go forward.
That move may, of course, require more adjustments to the glaze formulas, but it might not. I'll be finding out soon!
I'll be posting more very soon as there were some comments that I want to answer here. The conversation is a thrill. Getting feedback during the creative process is a wonderful way to find out what is needed.
More later...
Saturday, March 12, 2011
We're on Facebook!
Lowell Hill Pottery has joined the online social media revolution. Yes, I finally swallowed hard and put up a Facebook page for the pottery. Please visit the Lowell Hill Pottery Facebook Page and let us know you were there.
And if you like it, please "like" it and tell all your friends about it. The word is like butter. It's best when you spread it!
And if you like it, please "like" it and tell all your friends about it. The word is like butter. It's best when you spread it!
The Word Has Gone Out!
The first mailing for Lowell Hill Pottery has been sent. It's just a postcard, but the intent is to let people know that I am here and gearing up for production. I don't know how many Rowantrees customers have heard the news, but in case some have not, they will soon.
So this post is for those who have just tuned in. I encourage you to read as much of this blog as you can. Then by all means, check out my web site.
If you have found your way to this blog and are trying to find the web site, you can click on the dinnerware picture to the right or on this link:
Lowell Hill Pottery
I am also looking for input still. My survey is still up and will remain there for some time to come. You can find it here:
Lowell Hill Pottery Customer Survey
The more I know about your wants and desires, the better equipped I will be to meet them!
On a couple of notes (progress wise), it is clear that Duckshead Black is a very popular glaze. At this point in time, I do not have a replacement formulated that satisfies me.That is due only tot he fact that the pottery has been closed for the winter because there is no heat in the building. As soon as temperatures rise above the freezing point for good, I will be back in there working on this issue. The black glaze I was using in combination with Moss Agate and Turquoise will not work any longer as I have increased my firing temperature (more on that in a minute). So there is nothing for it but to work from existing notes to develop a replacement from scratch. It should not take very long. The experience I have gained int he last year will serve well.
Why go to all this trouble?
Many of you may recall the the original Rowantrees Duckshead was what was known as a "scrape-up" glaze. It was made using remainders of glazes that were scraped off the bottoms of pots and the inside of the glazing booth and that were combined and augmented with coloring oxides to produce the unique black glaze with the slight gun metal sheen. Reproducing this is a challenge for a few reasons. First, using scrape-up material means that the exact formula of the glaze changes each and every time it is mixed. Over its history, Duckshead changed in appearance quite a lot. It was only when Sheila Varnum standardized the recipe that firing results were more consistent. Still, in using left overs, it can be difficult to recreate the glaze appearance reliably each time. Consistency is made even more difficult when metallic oxides are added to produce a black glaze. Adding too much can make the glaze soft and prone to leaching. While this doesn't necessarily mean a safety problem, it will cause pottery to become dull with use. If you bought a particular glaze pattern for its beautiful shine, you probably want it to stay shiny throughout its life.
So going back to formula and creating a replacement Duckshead that is exactly the same chemistry from batch to batch is the best way to make certain that the reproduction is faithful to the beautiful Duckshead that Sheila Varnum ultimately created. It also assures that Lowell Hill Pottery will produce a Duckshead that is durable and hard.
This also means that Lowell Hill Pottery can use the scrape up remainders of its glazes over again. White scrape up can be reused for white pottery and such. So the lack of scrape up glazed does not mean the end of recycling!
Another way to assure durability is to fire the clay to the highest temperature that it can sustain. Because Lowell Hill Pottery is using a clay that is different than the original Rowantrees (details in an earlier post), I want to make certain to vitrify the clay as completely as possible. A higher temperature makes for more durable pottery because moisture can not work its way into the finished product.
The philosophy is simple. Lowell Hill Pottery can not improve on the designs of Rowantrees Pottery, but we can do all that is possible to preserve its beauty and improve on its durability. By this effort, Lowell Hill Pottery can preserve the heritage of Rowantrees far into the future.
Welcome and enjoy the ride!
Monday, February 28, 2011
The Die is Cast
Well, a die is cast anyway. Two of them to be more precise.
The experimentation has been progressing well. I think I have plaster mixing and pouring down to a near science at the very least. Here is a picture of the die that I have made for the Portland Head Light tile:
 It still needs to be cleaned up and sanded around the edges to finish it off, but I seem to have the technique (or at least my technique) down. I made two of these dies and hope to have this tile design in production before another month is out. I am also working on a die to stamp my maker's mark into the back.
Portland Head and Whaleback lights are the first two lighthouses to get this treatment,but I am planning on a road trip this summer to take pictures a several more. Fort Point Light will get attention next. It has a wonderful keeper's house and is unusual for its square light tower.
I am casting these dies using leather hard clay instead of bisque. Wile bisque would last longer (I can get two casts easily with leather hard - probably more if I make the slab thicker), I can turn on a dime with unfired clay. I roll the slab and incise it the first day, leave it between two sheets of drywall overnight, and then clean up the image the second day and do the casting. The raw clay peels away from the plaster easily after about an hour and is generally ready for another impression as soon as I clean it off.
I will be working on a mold to make larger trivet sized versions of the Portland Head and Whaleback lights. These will be int he neighborhood of 6.5 to 7 inches square and will sit on cork feet.
I'm doing all I can to stay active these days. This has been the most relentless winter I can remember. I have to go back to 1968 to find one in memory that came close. I recall the snowbanks so high that we would walk on top of them because you could not see the street from the sidewalk. It was the first year that I had to attend school on a Saturday because so many days had been called off.
You can't help but be affected by this. My back is still screeching at me because of the shoveling I did this weekend. I'm 52 now, so I know I have to be careful, but I'm a one-man show here on top of Lowell Hill, so there you are.
Keeping busy at some pursuit other than the mundane is essential. Small breakthroughs like successful die casting can do a lot to raise the spirits.
More soon!
The experimentation has been progressing well. I think I have plaster mixing and pouring down to a near science at the very least. Here is a picture of the die that I have made for the Portland Head Light tile:
Portland Head and Whaleback lights are the first two lighthouses to get this treatment,but I am planning on a road trip this summer to take pictures a several more. Fort Point Light will get attention next. It has a wonderful keeper's house and is unusual for its square light tower.
I am casting these dies using leather hard clay instead of bisque. Wile bisque would last longer (I can get two casts easily with leather hard - probably more if I make the slab thicker), I can turn on a dime with unfired clay. I roll the slab and incise it the first day, leave it between two sheets of drywall overnight, and then clean up the image the second day and do the casting. The raw clay peels away from the plaster easily after about an hour and is generally ready for another impression as soon as I clean it off.
I will be working on a mold to make larger trivet sized versions of the Portland Head and Whaleback lights. These will be int he neighborhood of 6.5 to 7 inches square and will sit on cork feet.
I'm doing all I can to stay active these days. This has been the most relentless winter I can remember. I have to go back to 1968 to find one in memory that came close. I recall the snowbanks so high that we would walk on top of them because you could not see the street from the sidewalk. It was the first year that I had to attend school on a Saturday because so many days had been called off.
You can't help but be affected by this. My back is still screeching at me because of the shoveling I did this weekend. I'm 52 now, so I know I have to be careful, but I'm a one-man show here on top of Lowell Hill, so there you are.
Keeping busy at some pursuit other than the mundane is essential. Small breakthroughs like successful die casting can do a lot to raise the spirits.
More soon!
Friday, February 11, 2011
Another Art Update
The more you work at something, the more you learn. I have been working with the tile art for both the Whaleback and Portland Head tiles. One thing became glaringly clear. Tiles of any size with a mosaic pattern on them need to be impressionistic. Realism just won't fit, and even if it does, it will be impossible to paint because the detail will be too small.
Needless to say, some reworking has taken place. Here is what the tiles look like now:

 Mind you, the line below the rocks on the Whaleback tile will be restored. I'm still playing around with placement on that one.
Note too that the names have been removed. They just took up too much space and interrupted the - what's a good word - flow of the art. I may put the names on the back, or assuming someone may actually want to mount one of these in a splash back someday, I may create a small card for each with a little history on each lighthouse. In any case, I wanted the tiles cleaner than text would allow.
Did you ever read "The Little Red Lighthouse and the Great Gray Bridge" by Hildegarde Swift and Lynd Ward when you were young? It's a story of (you guessed it) a little red lighthouse that guarded the shores of the Hudson River and kept ships safe from the rocks. It was very proud of the job it did. When a giant gray bridge is built right over it, the lighthouse believes that it has become insignificant. When a beacon shines from the bridge to light the river, the lighthouse is convinced that it is no longer useful. Then one night, a storm endangers ships by gripping them in fog. A tug crashes on the rocks because it can not see the beacon shining from atop the bridge. The bridge calls out to the lighthouse to shine its light and sound its fog bell. When the keeper arrives, the lighthouse is lit and the bell sounds out. Then the little red lighthouse discovers that small does not mean insignificant. It regains its pride in its function.
I must have missed the part of the book that told the reader to travel up Riverside Drive in New York City to visit the little red lighthouse. It is, in fact, properly known as the Jeffrey's Hook Light. It sits beneath the George Washington Bridge and is a New York City landmark.
I know my tile project focuses on Maine lighthouses, but this one seems a good exception. The artwork is currently in process after having received several pictures of the lighthouse from a friend with permission to use them as I see fit.
It's a great story and was one of my favorites when growing up.
Needless to say, some reworking has taken place. Here is what the tiles look like now:

Note too that the names have been removed. They just took up too much space and interrupted the - what's a good word - flow of the art. I may put the names on the back, or assuming someone may actually want to mount one of these in a splash back someday, I may create a small card for each with a little history on each lighthouse. In any case, I wanted the tiles cleaner than text would allow.
Did you ever read "The Little Red Lighthouse and the Great Gray Bridge" by Hildegarde Swift and Lynd Ward when you were young? It's a story of (you guessed it) a little red lighthouse that guarded the shores of the Hudson River and kept ships safe from the rocks. It was very proud of the job it did. When a giant gray bridge is built right over it, the lighthouse believes that it has become insignificant. When a beacon shines from the bridge to light the river, the lighthouse is convinced that it is no longer useful. Then one night, a storm endangers ships by gripping them in fog. A tug crashes on the rocks because it can not see the beacon shining from atop the bridge. The bridge calls out to the lighthouse to shine its light and sound its fog bell. When the keeper arrives, the lighthouse is lit and the bell sounds out. Then the little red lighthouse discovers that small does not mean insignificant. It regains its pride in its function.
I must have missed the part of the book that told the reader to travel up Riverside Drive in New York City to visit the little red lighthouse. It is, in fact, properly known as the Jeffrey's Hook Light. It sits beneath the George Washington Bridge and is a New York City landmark.
I know my tile project focuses on Maine lighthouses, but this one seems a good exception. The artwork is currently in process after having received several pictures of the lighthouse from a friend with permission to use them as I see fit.
It's a great story and was one of my favorites when growing up.
Monday, January 31, 2011
Tile Update
I have done more work on the tile design for Whaleback Light and added new artwork for Portland Head Light. Here are the line drawings.

 The ocean in each of these tiles will be roughed out when the original is cut. I like an active, choppy sea that provides some motion. I'm hoping to get the appearance of sea spray by stippling as well. But it has to be doable in a short period of time.
Making these in four-inch sizes will probably necessitate some simplification of the mosaic design so that the hand decoration doesn't take too long. I am also thinking of making a larger trivet size, which would allow for more detail. Time and experimentation will tell, but just looking at the close tolerances of the light keeper's house on Portland Head give me the shivers. It's instantly recognized - the light being as iconic as it is - so getting it right is important.
But it's nice to have artwork to look at and work from.
Sunday, January 30, 2011
Pressing Matters
The tile making process took another big step ahead this weekend with the building of my tile press. I'm no engineer, but I have to say I'm rather pleased with this effort. As with any other project like this, I sort of designed it as I bought the parts. It's not the most efficient way of doing things, but when it comes to any sort of machine work, I tend to do better learning the ropes while I do things.
I knew I needed an arm with a spring for return. I also knew I needed an upright for the arm to pivot in. Then there is the press foot. Those were the essential three pieces for the press. Once I had them in place, I discovered that a guide arm would be necessary to keep the press foot from swinging as it raised and lowered. I would also need to figure out where I wanted the action to start and finish.
It was actually a lot of fun to observe this simple machine in action and determine what enhancements would be needed. It was worth the four trips to the hardware store it necessitated.
 Potters may notice that the arm and press foot are made of parts from an old Bailey hand extruder. I modified them by drilling a few holes and moving parts around a bit.
Drilling through tool steel with a hand drill is such fun. But if you're looking for a handy shop tip, here is a great discovery I made: olive oil makes a great cutting oil.
This press will work best for smaller tiles. There are better methods for making larger ones and I will be making molds for those in the near future. What I have to set about doing now is making originals to cast molds from. In my last post, I included a picture of the first die I made. It's rather big for a press like this unless working with pretty soft clay. Still, I gave it a try to see how the process works. Here is the result (before edge cleaning).
 Not at all bad for a very first attempt.
Regarding originals from which to cast dies, I have started artwork on a series of tiles featuring lighthouses in Maine. They will be mosaic in design like the dove tile above. While there is still quite a bit to do on it, here is a preliminary layout for a tile featuring Whaleback Light. I sill want to add rocks to the foreground and clouds to the sky. The clouds will obscure the moon a bit for effect.
 Mind you, the typeface will change. It's just there as a place holder, but I do plan on putting the name of each light on the tile.
But things are once again off and running!
I knew I needed an arm with a spring for return. I also knew I needed an upright for the arm to pivot in. Then there is the press foot. Those were the essential three pieces for the press. Once I had them in place, I discovered that a guide arm would be necessary to keep the press foot from swinging as it raised and lowered. I would also need to figure out where I wanted the action to start and finish.
It was actually a lot of fun to observe this simple machine in action and determine what enhancements would be needed. It was worth the four trips to the hardware store it necessitated.

Drilling through tool steel with a hand drill is such fun. But if you're looking for a handy shop tip, here is a great discovery I made: olive oil makes a great cutting oil.
This press will work best for smaller tiles. There are better methods for making larger ones and I will be making molds for those in the near future. What I have to set about doing now is making originals to cast molds from. In my last post, I included a picture of the first die I made. It's rather big for a press like this unless working with pretty soft clay. Still, I gave it a try to see how the process works. Here is the result (before edge cleaning).
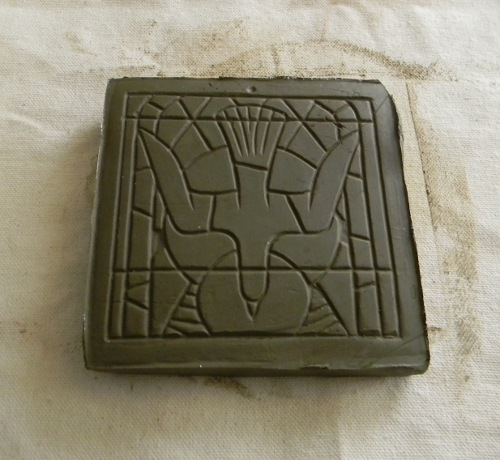
Regarding originals from which to cast dies, I have started artwork on a series of tiles featuring lighthouses in Maine. They will be mosaic in design like the dove tile above. While there is still quite a bit to do on it, here is a preliminary layout for a tile featuring Whaleback Light. I sill want to add rocks to the foreground and clouds to the sky. The clouds will obscure the moon a bit for effect.
But things are once again off and running!
Monday, January 24, 2011
To Die For...
I knew that making tiles would require a fair amount of study on my part. I wasn't wrong.
It wasn't the clay work that proved tricky. I have plenty of experience with clay and know how it behaves. Mind you, that doesn't stop a person having to learn the best way to keep a small slab from warping. That's something that clay likes to do under most conditions and figuring out how to keep it from happening has been the work and source of frustration of potters since someone said, "Hey look! If you line a basket with this sticky mud it will hold water!" There are techniques to stop warping and I know a few of them.
But where I had a lot to learn (and still do) is in plaster work. Mixing and pouring a wedging table is not that difficult once you get the math out of the way. But working in smaller quantities is a little trickier. See, the problem is that all plasters come with what is called a "use consistency." It is expressed as a number, and the use consistency of the plaster I have been working with is 70. What that means is that for the strongest possible end product, I have to mix 70 parts water for every 100 parts plaster.
By weight. Go figure. And figure I did. Long and short, I came to the answer by two routes. The first was to take someone's word for it that I needed 2.85 pounds of plaster for each quart of water. The second was to weigh a quart of water and calculate it myself. A quart of water weighs 2 pounds. Dividing 2 by 0.7 gave me...2.85. I'm a believer now. My algebra teachers would be so proud.
All of this is because making tiles first requires me to make a mold. The mold - or in this case the die - is used to stamp a consistent pattern on each tile. if you want to make tiles in any sort of production model, you need to do it this way. Hand carving each tile would take far too long to be practical.
The mold I wanted to make was a die mold. This type of mold is pressed into the clay to create a shape or, in this case, an impression. That meant hand making an original to make the mold from. Remember that tile I thought I'd make for the holiday season? It's a few entries down. I did make the original but ran out of time before I could put tiles into production. So I decided to put that project to next year.
Just as well. The process of learning to make the mold, while moving along nicely, is still a work in progress. But there has been progress! Here is a picture of the original and the die mold that I made from it just this evening:

The original was warped, so this die can't be used for production, but the mold form I made is ready as soon as I have a good, flat original. At least I have the process under control now. It will be full steam ahead very soon.
I have a number of ideas for tile series and will be working on the artwork for them starting next week. For now, I have other issues to concentrate on and concentration is proving difficult as I try to stay warm in the icebox that Maine has become. It happens almost every year at this time, but still it always seems to catch me up a little short.
More soon!
Subscribe to:
Posts (Atom)